What Goes Into Creating an NFT?
A behind-the-scenes tour of the tech that goes into publishing a cartoon picture
There are lots of great popular explainers on what NFTs are, why they might be important, and why the current mania may be a problem.
I don’t want to focus this email on any of that.
Instead, I want to walk you through a behind the scenes of how exactly an NFT comes to life, using a recent example of a project I did to share some of the fun technology that makes all this possible.
FIRST, A 60 SECOND PRIMER
A non-fungible token (NFT) is a record of ownership on the blockchain. More specifically, it’s a record of ownership of a specific asset, rather than a balance of a generic asset.
If, for example, you have $100, it doesn’t matter which 100 dollars you have. They’re all the same. But if you own 100 homes, it really matters which homes they are — their value, your connection to them, etc all depend on which individual homes we’re talking about. They aren’t interchangeable.
An NFT is simply a standard for contracts to track ownership of those specific assets. You can think of it as a ledger of ownership, but rather than saying “Zach owns 100 dollars” it says “Zach owns the assets with id #1, #7, and #12.”
The first use case for this technology to see mass adoption has been digital art. That will change in the future, but as a result, today, NFTs are mainly associated with cartoon profile pictures.
THE BeNFT PROJECT
Ben Mezrich is one of my favorite authors. He wrote The Accidental Billionaires (turned into the movie The Social Network), Bringing Down the House (turn into the movie 21), and lots of other incredible stories.
He’s working on a project about the NFT craze and decided to do something interesting: release 3 NFTs (now known as BeNFTs) for his audience to buy, and offer any fan who owns all 3 a share of the earnings if the work gets turned into a movie.
I ended up connecting with his team and working on the technical side of the project, so we’ll walk through the 2nd NFT (which launched last week) as an example.
Here’s the outline of what we needed to accomplish:
1) This second NFT was to be free, but only available to holders of the first one. So we needed to get a list of all the owners of the first NFT, and construct a way for this contract to verify that anyone trying to mint their own version was a part of that list.
2) Most profile pic NFTs are not illustrated one by one. Instead, the artist draws each of the traits, and a developer uses a script to randomly generate the final images from those traits. We’d need to generate the art and upload it to live somewhere with no risk of being taken down.
3) With those pieces in place, we’d need to create the code for the NFT itself, and ensure it could accomplish everything we needed, with no security risk.
4) Finally, we’d need to build a front end website to make it easy for users to mint their NFTs.
Let’s get started…
STEP 1: CREATING THE WHITELIST
The first step is to create a “whitelist” of holders of the first NFT.
There are a few services that help developers grab blockchain data, but as I tried to experiment with them, they all felt finicky. Data would come through inconsistently, and I was left feeling like there was a chance someone who should be on the list wouldn’t make it.
This is a major challenge with blockchain development: since everything is immutable (in other words, it can never be changed), you need to get it right the first time. If someone found later that we accidentally skipped them, there would be no way for us to make it right.
Fortunately, accessing blockchain data directly is pretty simple. There are services like Infura and Alchemy who offer access to nodes (computers that hold all the data on the chain). And, unlike transactions that actually edit the blockchain (which take ~15 seconds and can be inconsistent), retrieving data is as quick as any API.
I wrote a script to ping Infura for the owner of each ID, and soon had a CSV with 3500 addresses of holders of the original BeNFT.
(After talking to a few other devs running into similar issues, I ended up generalizing my code and releasing it as an open source tool for others to use. This is one of my favorite things about this space. Everything is so new, and the tooling is still so early, that there’s often an opportunity to do a little extra work to help others save a lot of time. It feels good.)
With a list of addresses you may think we’re done but… nope.
Storage and computation are very expensive on Ethereum. It would technically be possible for us to upload all 3500 addresses and simply have the contract check if each person is on that list, but the cost to us (for the upload) and them (for the check) would be astronomical. So we needed a better way.
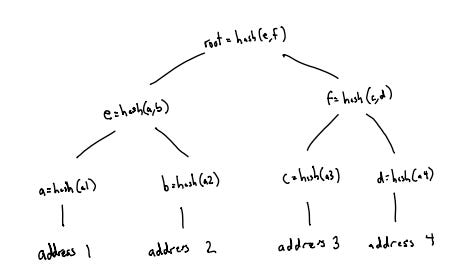
To that end, we’re going to use something called a merkle tree to store these proofs. Here’s how it works:
First, we’ll organize all the addresses as the leaves on a tree.
At the node connecting two leaves, we apply an irreversible hash function to the two leaves and assign the value of that hash function to the node.
We continue this pattern all the way up the tree, hashing each level into the level above.
In the end, we are left with one value at the very top of the tree (the “root”).
This allows us to create very inexpensive proofs that your address is in the tree.
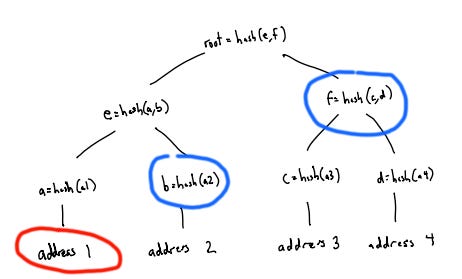
Rather than storing the whole tree, the contract just needs to store the root. Then, when I submit my transaction, I include my address (circled in red) and a list of the values that my address was hashed with (circled in blue), all the way up the tree to reach the root.
The contract can simply hash my address with each of the blue circles and, if it ends up with the root, this proves that my address is in the tree and I am permitted to mint.
STEP 2: GENERATE THE IMAGES
Sometimes you’re the one creating the open source tools, and sometimes you’re the one who gets to use them. This time I got the easier job: I found the Generate Art NFT repo on Github, and I was able to use their code as a starting point.
NFT artists illustrate each of the traits, but they don’t put them together. Instead, they send over folders of all the PNG images that when layered on top of each other, would create different variations of the characters. It’s our job to put them together.
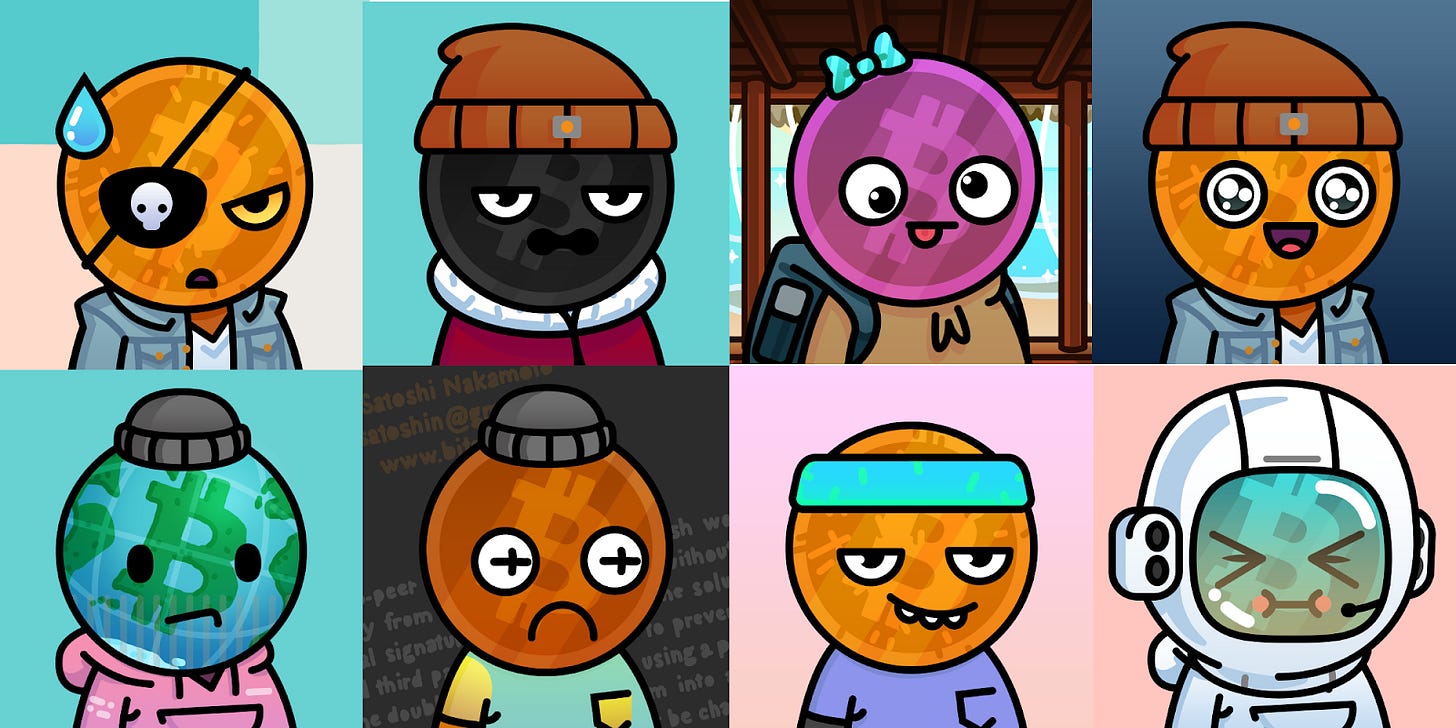
Customizing and running the code above, it randomly selects a background, then layers on top a randomly chosen body, followed by a head, eyes, a mouth, and a hat. In the end, we have a totally unique character.
The script ran for a couple hours and outputted 3500 unique images. With a few more scripts, I was able to generate a metadata file containing the ID and traits for each of these images.
But where to store these images?
The challenge with NFTs is that (in most cases) the on-chain data doesn’t actually contain the image. Storage on the blockchain is just too expensive. So, instead, the blockchain attests to ownership of a token ID, and provides a link to where the metadata and image associated with this token ID can be found.
That link could point anywhere: Dropbox, Google Drive, AWS. But if anything were to happen to that hosted image, there would no longer be anything associated with the NFT. It would just be a token ID with no meaning.
If we’re going to all this trouble to have decentralized, permissionless assets, we should probably have a way to ensure the metadata and image are immutable too, right?
This is where IPFS comes in. It’s a protocol where your uploaded files are split apart and cryptographically hashed, so that they can be stored on various computers (nodes) in a censorship resistant and tamper-proof way.
After uploading the metadata and image files to IPFS, we are finally ready to create the contract.
STEP 3: THE CONTRACT
The contract is the heart of an NFT. Everything else we’re doing is a way to extend its functionality (add images, verify addresses, etc) — but without a contract, you don’t have an NFT.
The contract requirements were originally laid out in EIP 721, which defines a standard for non-fungible assets.
As we discussed before, the only purpose of this contract is to store ownership of specific assets. This standard simply defines the way in which we do that. It includes 8 public functions:
balanceOf(address) => how many assets does this address own?
ownerOf(id) => which address owns this specific id?
safeTransferFrom(from, to, id) => transfer this id from one address to another
transferFrom(from, to id) => same as above, without a safety check
approve(address, id) => approve an address to transfer this token id on my behalf
getApproved(id) => get the approved address for this token, if it exists
setApprovalForAll(address) => approve an address to transfer anything on my behalf
isApprovedForAll(address, address) => is this address approved to transfer anything?
Other functions and types of storage are needed to make all this work, but if a contract has those functions publicly accessible (plus a few events emitted when certain things happen), then it’s an NFT.
A security firm called OpenZeppelin has released verified versions of many standards, including ERC721, and they are the de facto standard for many in the industry. Building off of their backbone, I customized the contract to verify our merkle proofs, to point to our images on IPFS, and to perform some simple access control and safety mechanisms.
After some testing on testnets, we’re ready to push it onto the blockchain.
This is the scary part! In case I haven’t mentioned it enough times, storage and computation on the blockchain are expensive, and deploying a new contract requires both. No amount of confidence quite prepares you for spending thousands of dollars to push up code that is unchangeable once it’s live.
With our hearts beating a little faster and the contract live on Ethereum, the final step is to create an interface for users to interact with it.
STEP 4: THE FRONT END
I usually partner with a front end developer on this piece, but since this page needed to do some more complicated stuff (like generate the merkle proofs), I decided it was best to do it myself.
I wanted the experience to be as simple as possible, so I decided that this flow would work best:
When users land on the page, they are asked to connect their wallet.
Once their wallet is connected, the page immediately tries to create a merkle proof from their address. Based on whether this succeeds or fails, we load a custom page that tells them whether they are or are not on the whitelist.
If they are on the whitelist, we give them one simple button to click to mint. When they click that button, it calls the “mint()” function on the contract, which confirms their whitelist spot, confirms they haven’t minted yet, and mints them an NFT.
There’s enough weird stuff in web3 land that I knew that there would inevitably be people who were unable or unwilling to mint through the page. So I also included a small section on the bottom of the page where people could generate and export their own proofs to use directly with the contract.
And voila! The result is live at mintbenmezrichnft.com.
WHAT’S NEXT?
The project has been live for a week and already almost 2000 people have minted theirs. According to OpenSea, the cheapest one available for purchase is around $300, giving an estimated floor value of $1mm for the entire collection. Pretty cool.
I’m working on a few other projects for Ben’s team, but most of my focus right now is on smart contract security (white hat hacking to find and report exploits) and zero knowledge proofs (building an open source app for anonymous voting). More to come on those soon.
Until next month,
Zach


